|
|
Welcome to the tips & FAQ's section.
I tried to put here all things that are of concern to the HX family users.
The following topics are available (please feel free to raise more topics).
Formatting 3.5" HD floppies for usage with MDR-2/3
Attributes issues and errors on the MDR and suggested solutions.
Converting 3.5" MDR2/3/4 floppies for usage with PC - NEW!!
Upgrading the HX-1
Downloading Yamaha's manuals
Formatting 3.5" HD floppies for usage with MDR-2/3
Any MDR-2/3 user knows that even though it uses a DOS-like file system, no PC will read it.
So it is needed to go the other way around... Let's format the floppy on a PC and save data with
the MDR. (Thank god it works...)
The MDR-2/3 was built to work only with old 3.5" DD (double/low density) disks (720KB
DOS formatted.) so it is needed to "fool" your PC floppy drive in order to be able to format
HD (high density) as DD. First, we need to cover the "extra hole" which exist on the HD
type (see image below).
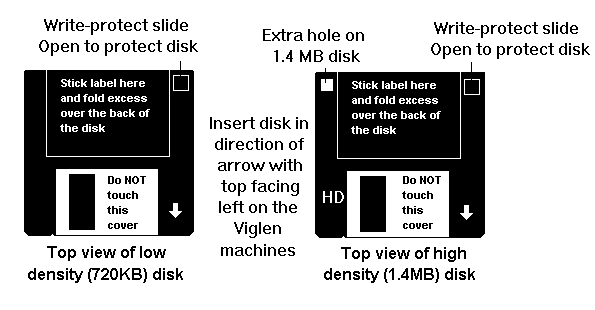 A small piece of glue tape to cover BOTH sides of the hole would do the trick.
In MS-Windows XP/Vista:
Go To: 'Start' -> 'Run' -> type "cmd" and press Enter (to open the command prompt (Dos emulation) window).
Type: format a: /t:80 /n:9
In MS-Windows 95/98/ME:
Go to: 'Start' (mouse right-click) button -> Explore -> 3.5 Floppy (A/B:) (mouse right-click)
-> Format...
In the 'capacity' window choose '720KB', disable the 'Quick format' tag if marked (by left-clicking
on it), insert the "dealt-with" HD floppy and click on 'Start' ...
In DOS and MS-Windows 2000 command window:
Type: format a: /f:720
Insert the "dealt-with" HD floppy to your PC floppy drive
(in the command line above it should be a:).
And press Enter...
Important note:
It is critical to read the next section regarding the attributes - please read it!
Attributes issues and errors on the MDR and suggested solutions
Very important: You must turn off all 'Attributes' flags of all files AFTER saving them on a
floppy disk, or they might not work on some MDRs, displaying a CF04 Error.
Here is how to do it:
Select all files on the disk->right-click on the mouse->properties->
on the lower part of the window uncheck/clear the 'Read-only', 'Hidden' and/or 'Archive' boxes. (and/or any other boxes).
Note for Win7 (or later): For some reason, the 'Archive' attribute was moved from its place in the
'Properties' window. In order to solve that (as it is the most problematic attribute of them all..),
click on the 'Advenced' button near the other 'Read-only' and 'Hidden' attributes and uncheck the:
'File is ready for archiving' - This is the once called 'Archive' attribute.
Note 2: You can always use the 'attrib' command (instead of 'dir') in the command/cmd terminal
window (start->run->cmd) and parform 'attrib -a' to remove the archive attribute from all files and
folders in that location. (see 'attrib /?' for further help).
Note 3 (also for win7 or later): In Win7 there are more possible attributes,
such as 'Indexing' or 'I' in the 'attrib' view, this can be removed by the 'attrib -i'
command and as such - all and any possible others should be removed.
Converting 3.5" MDR2/3/4 floppies for usage with PC - NEW!!
I Must say this is the most FAQ I've even encountered by many fellow-players around the world.
We all have many disks that were formatted and recorded with the MDR (2/3/4) and we all
want to be able to access/edit/archive/backup these files before the floppies will "die".
Unfortunately, during the 80's, someone in Yamaha has decided that the MSX-DOS format will
be the main (and only?) format to be used in all their electronic instruments created since then.
The MSX-DOS file format is quite the same as the "regular" MS-DOS format, but because some
minor changes, it can't be read by any MS-DOS version greater that DOS-3.0 which means
practically - everyone...
So, I've decided to solve that matter once and for all and found this extraordinary solution
by Mr. Rudolf Lechleitner from Austria who has programmed
the best MSX to MS-DOS/Win conversion software I've ever seen !!
It supports all type of windows (XP/Vista/7/..) and most of the MSX disks for the "old"
Yamaha instruments including: MDR2/3/4, PSR-600/SQ16/6700, SY77, SY99, DX7fd,
and many more !!
Download:
From the original site (http://www.lexlechz.at) here
Or directly from our site - here (v0.14)
Older versions: (v0.13)
Importent notes:
1. Always use write-protected disks !!! Make sure you've moved the cover to open
the hole. (See above section.)
2. If you don't have a floppy drive, it's easy to do so with a USB portable floppy drive (~30-40$)
3. In order to access (copy, replace, delete, etc..) the files on the floppy itself, please select:
File->new...->(check) Copy data from Disk->Select the floppy drive->Click OK.
4. If you are using HD floppies, don't forget to cover the HD "extra hole"
or the program will not be able to identify the disk and the operation fails.
Upgrading the HX-1
This is one of the better things to hear of the HX. There IS an upgrade available.
The upgrade corrects some of the HX's MIDI bugs. (It is not a 'Must have'.)
In order to perform the upgrade you need to order 3 chips (ICs) from your local Yamaha dealer:
XB422100 and XB446200 (IC6 and 7 on the MSC board).
XB447 (IC8 on the RSC board).
ICs Installation procedure:
| 0) | Preparetions:
1 cross-headed screwdriver, 1 flat screwdriver, 1
IC remover/puller/PLCC remover
(or a small flat screwdriver.)
Turn off the instrument (even unplug it from the electricity)
Be careful from static charges (!!) use an Antistatic Work Mat
if you think there might be a problem with that !!
|
| 1) | Download a part of the service manual here
|
| 2) | After performing the preliminary disassembly of the tone module
|
| | according to the service manual, follow these pictures:
(These pics are a lot bigger - download them for full resolution..) |
| 3) | 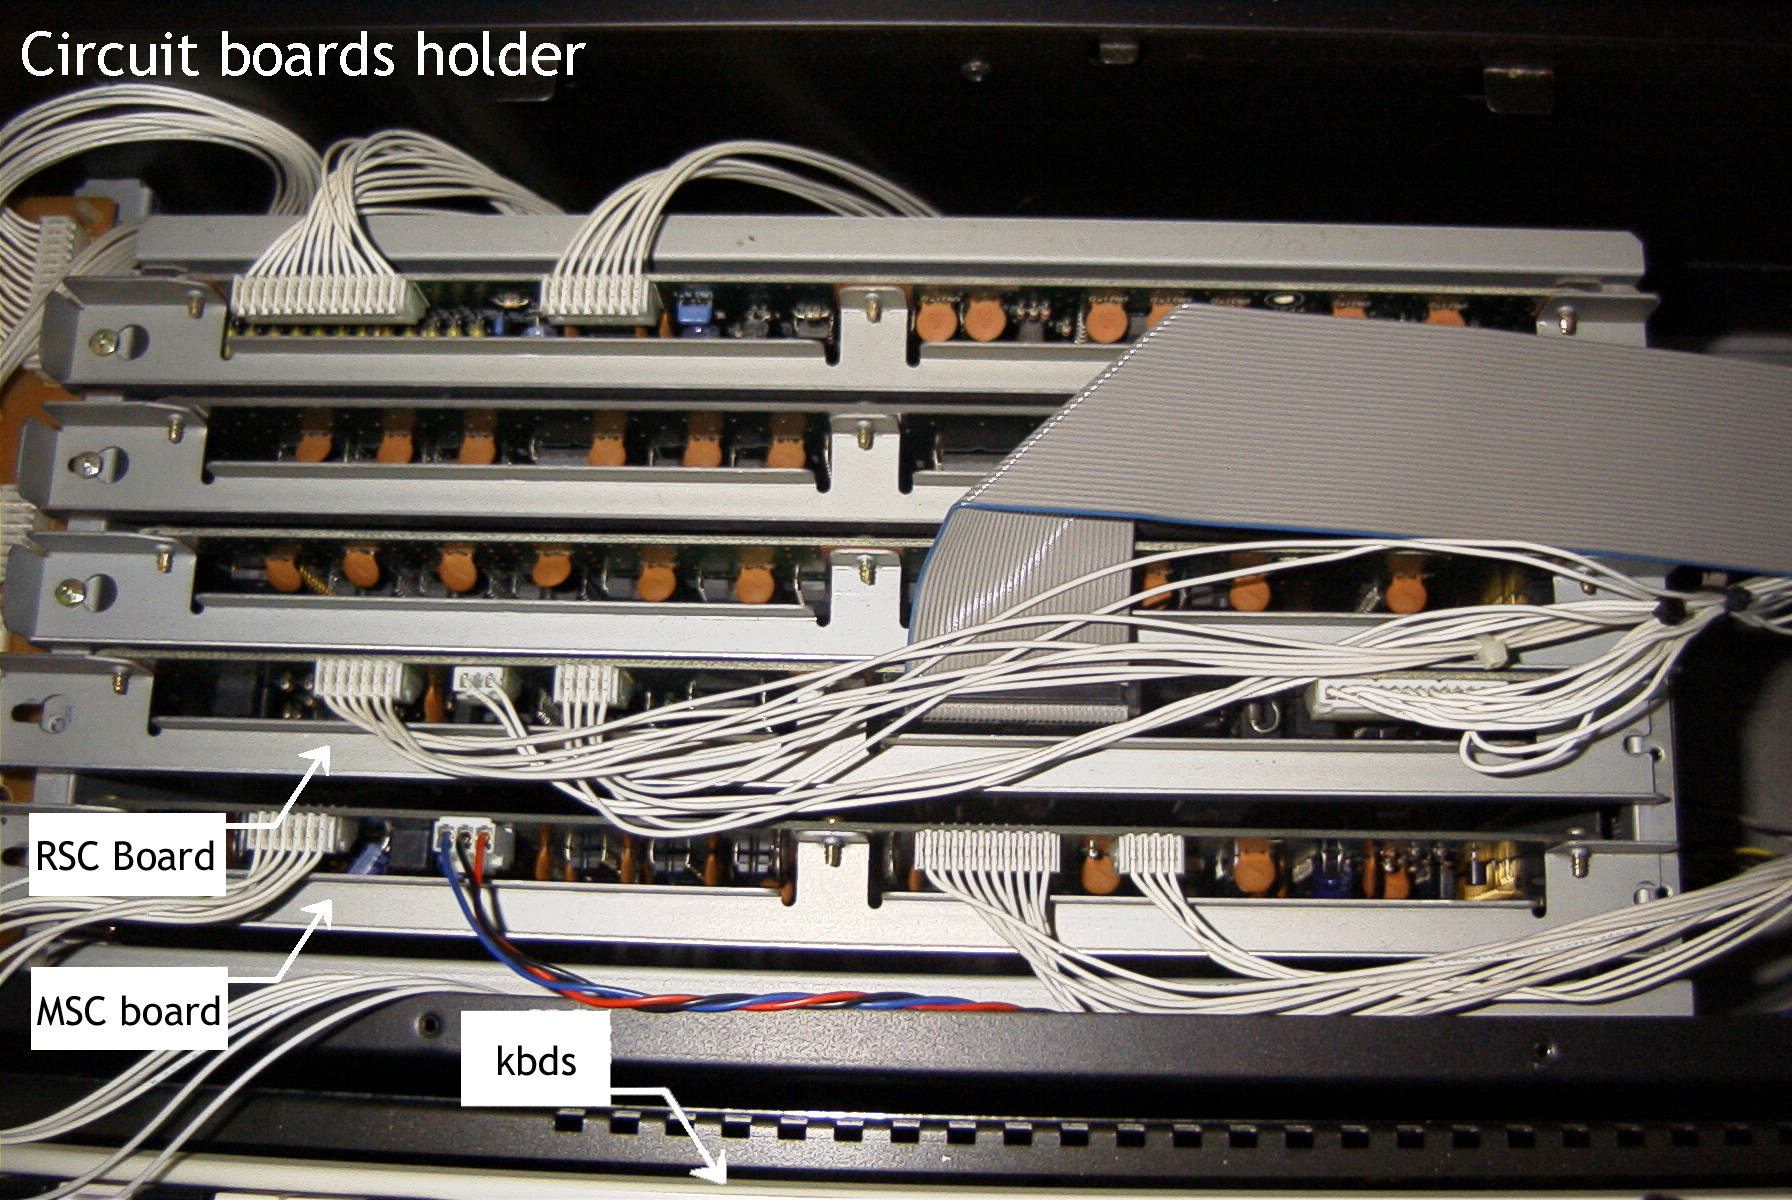
This picture shows the circuit boards holder from top view. (we need to unscrew screws on
both sides of each circuit board to be able to release it-see service manual).
No wires needs to be removed as there is enough slack.
We'll start with the MSC board which is closer to the keyboards.
It is needed to slide each board about 1/4 inch to the left to free it from its socket.
|
| 4) | 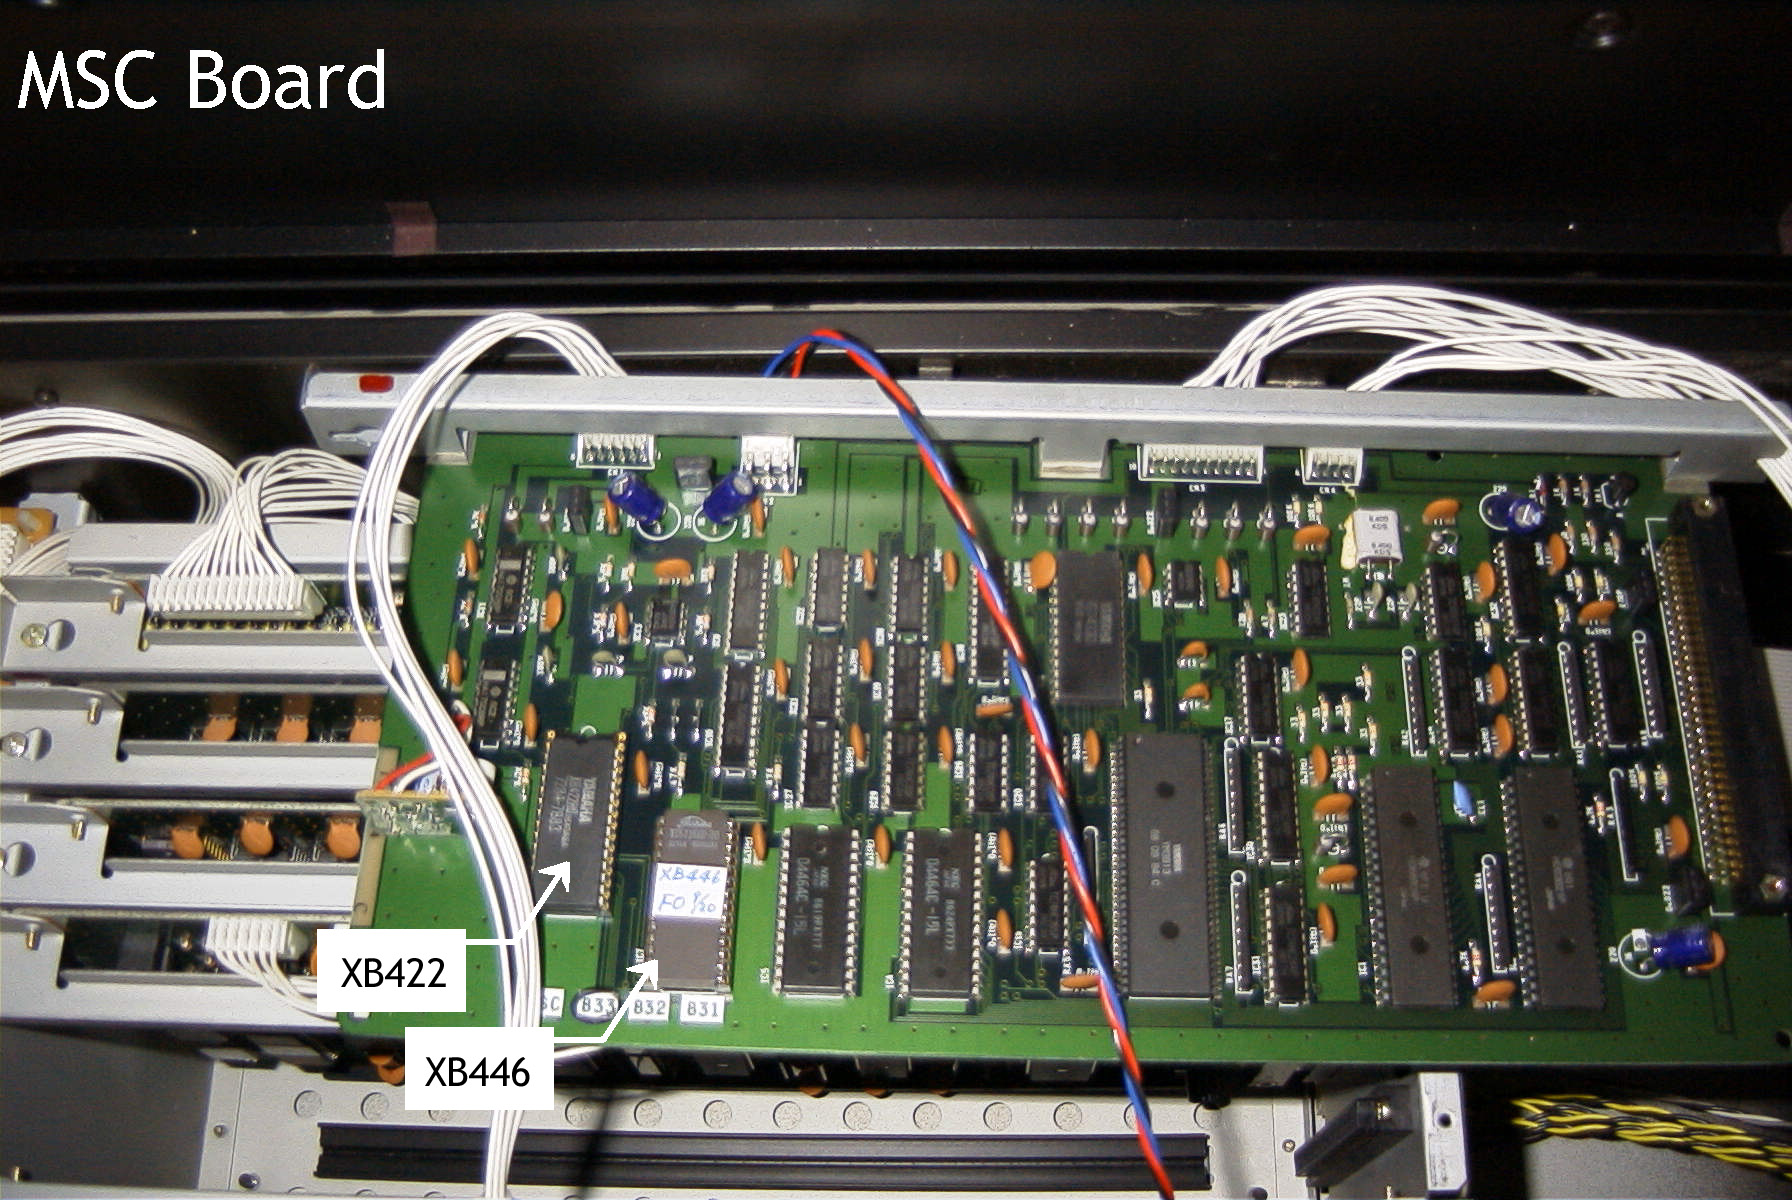
The MSC board:
IC 6 (422) & 7 (446) are over on the left (see picture). Use the IC puller/PLCC puller
(or a small screwdriver-be careful !!) to remove them from their sockets.
Please note: it is needed to pull the ICs up VERTICALLY:
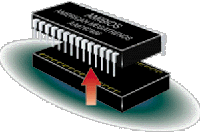
DON'T EVER (!!!) TRY TO PULL AN IC WITH YOUR HANDS OR ONE SIDE
HIGHER THAN THE OTHER !!!
You can see that the original IC6 (422) is smaller than its holder: there are two empty holes
on each side of the upper part of the holder - that's O.K.
After pulling out the old ROM ICs 6&7 (very gently), put the new ones in their places using
your hands - very gently..
The following figure shows the correct direction of the chip and the holder:
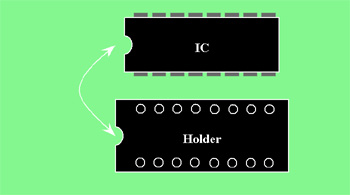
Put niche to niche. (Sometimes the holder's niche is drawn on the green board.)
Note the new EPROM IC6 (422) is bigger than the old one and now there is only one empty
hole on each side of the upper part (near the niche) of the holder. (That's also O.K.)
|
| 5) | 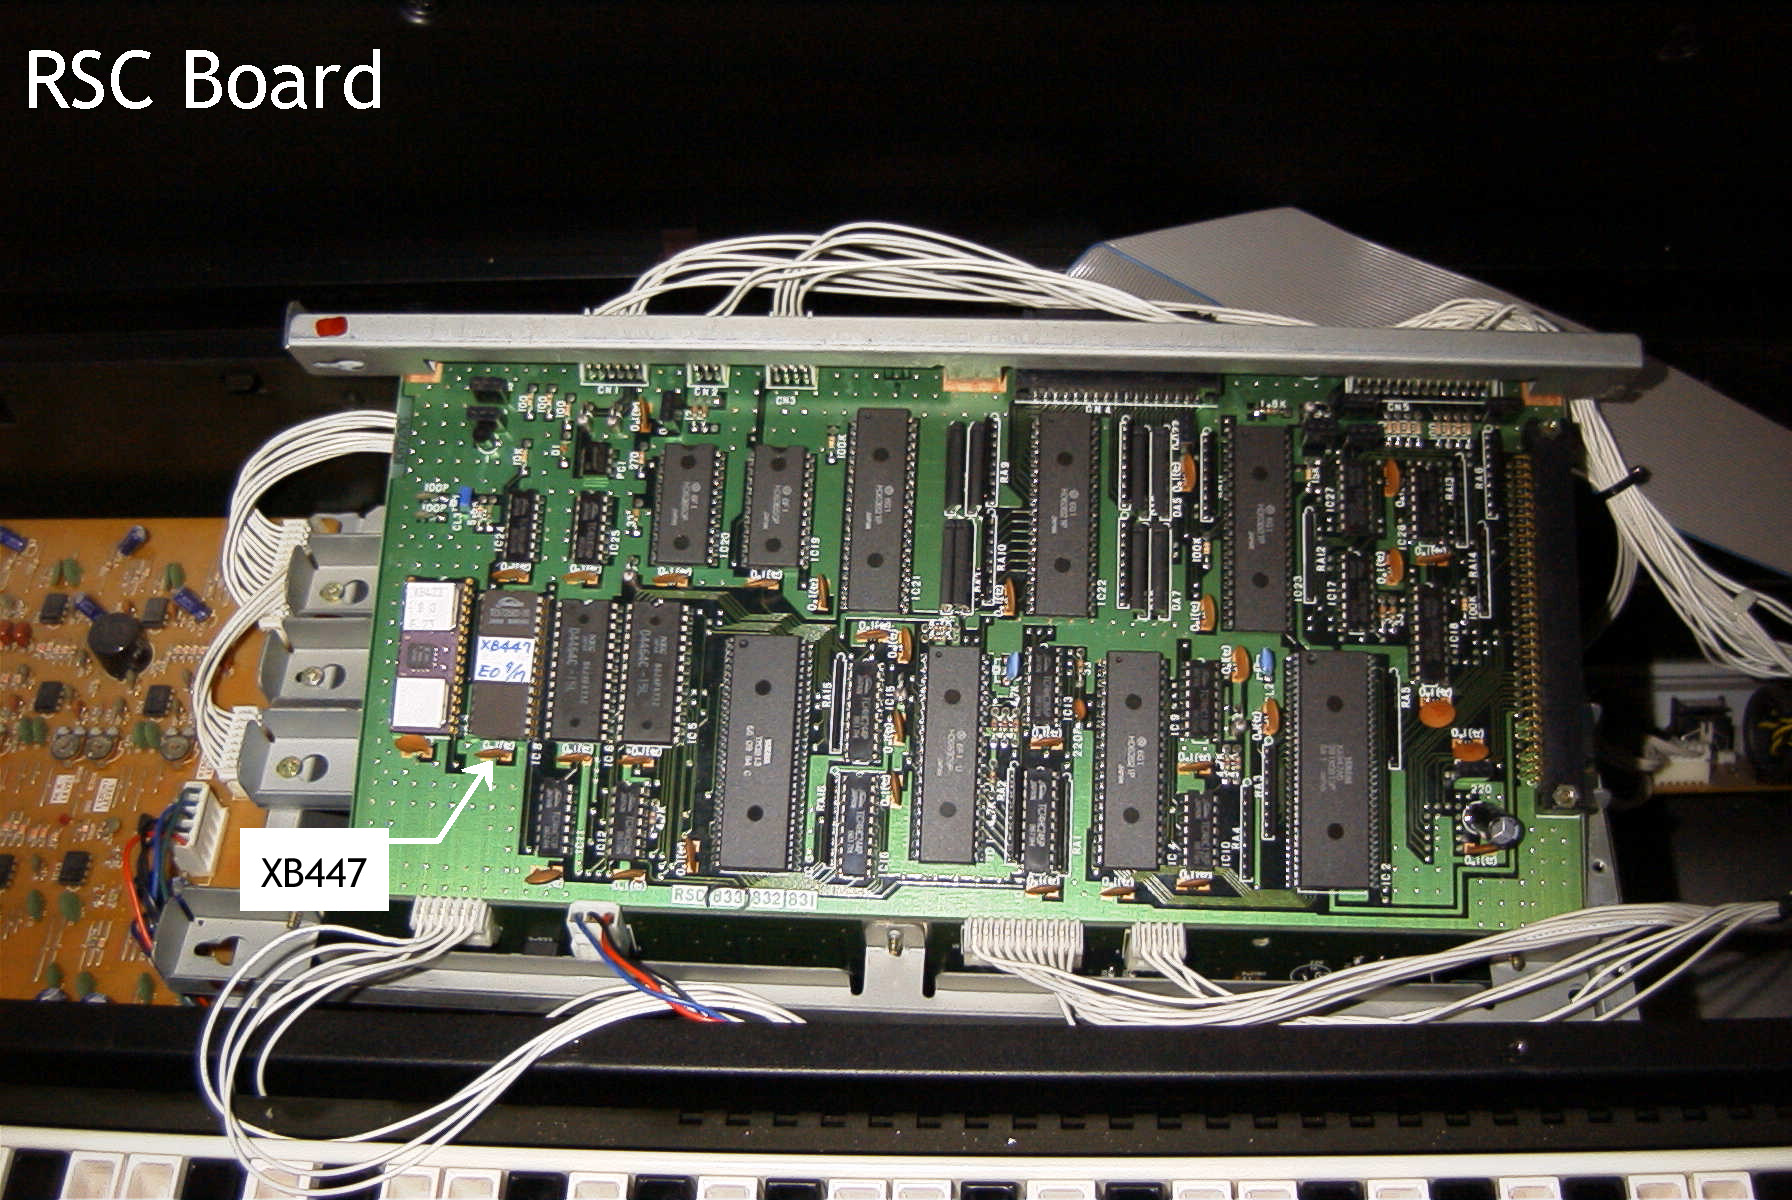
The RSC board:
Well, after the MSC board, it's very easy...
Take out (again - VERY gentle !!) IC8 (447) - it's the second one from the left.
and put the new 447 EPROM IC.
|
That's it...
Please install the old ICs in someplace safe (the EPROMS are only guaranteed to work for
ten years, after that, it's pure luck...)
Enjoy..
Downloading Yamaha's manuals
Yamaha's manuals can be found in the following location:
http://www.yamaha.co.jp/manual/english/
To read them it is needed to use the Adobe Acrobat reader (V4.0 or above - recommended).
|
Back to top.
|
|
|
|
Sincerely yours James Cohen Israel. 
|